Flutter七日游第七天:2018-12-22 天气:雨-阴
零、前言
最后一天了,今天将把前六天的零碎知识整合起来,以及未涉及的零碎知识
最后会附上源码,在github,我按天分包稍微整理了一下,顺手Star一下吧
顺便提一下:Dart语法的相关测试在test包的base里(怕你们找不到)
与Android代码交互后感觉flutter还是蛮可以的,可惜没条件玩ios,不然岂不是可以通杀
(给我七天或许可以把ios跑一圈,以后有钱再说吧)
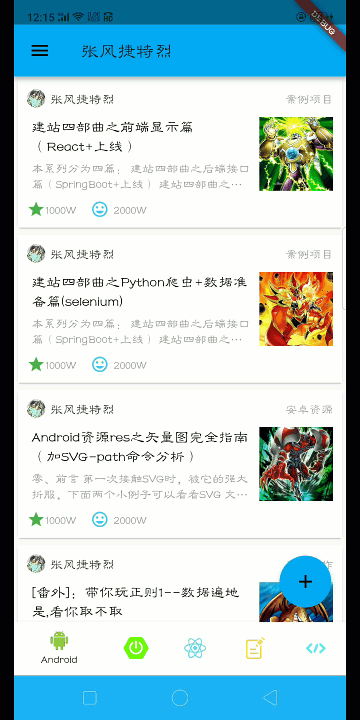
留图镇楼:分类效果和查询效果
| - | - |
|---|---|
 |
 |
一、字体图标的相关问题
1.字体图标:
字体图标放大不变形,又能改变颜色,主要根据
.ttf的字体,
然后图标算一个文字,根据unicode来对应图标,就可以用了。Icon(Icons.android)也许你经常用,但内置图标有限,只能测试玩玩
实际上用还是需要自定义才行,前端的时候有字体图标,Flutter应该也行
1 | //比如我们经常怎样用: |
2.进入源码看看:
貌似都是静态常量,核心在unicode,如
0xe577,还有就是字体(MaterialIcons)
1 | /// * [design.google.com/icons](https://design.google.com/icons/) |
3.怎么才能自定义字体图标
玩前端的应该都知道:还是进入阿里图标神库:iconfont
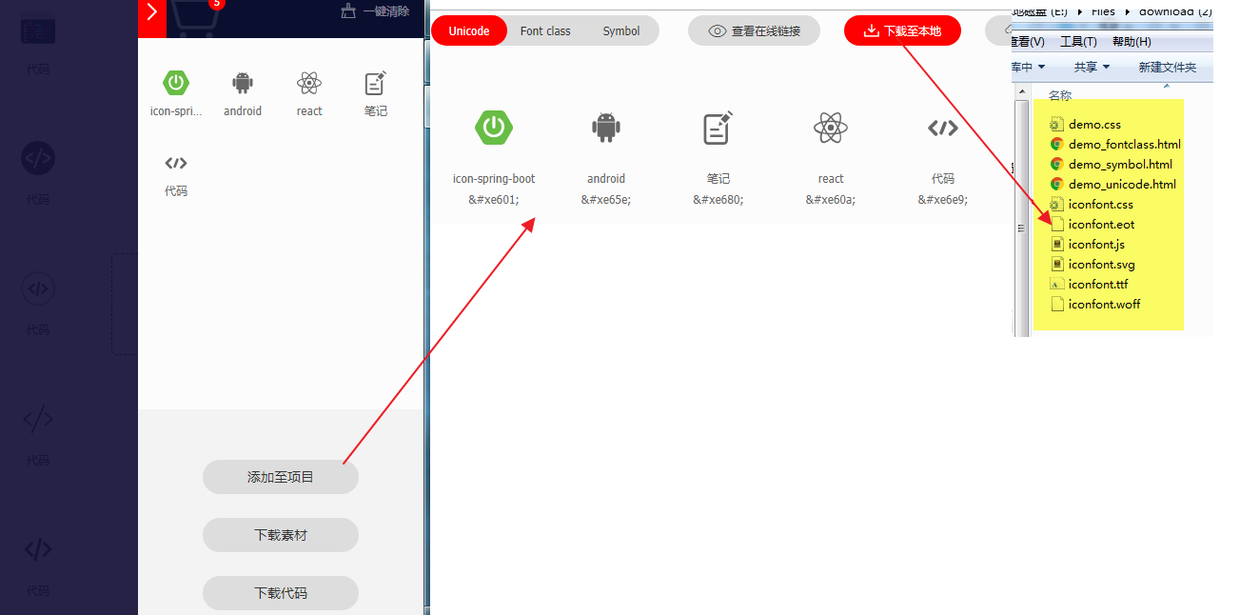
4.根据Flutter内置的类,我写了一个自动代码生成器
虽然直接也能用,不够要记住图标的unicode码,算了,还是跟Flutter看齐吧
注意:为了简单使用:拷贝到的位置,命名,请务必和下面保持一致!保持一致!
把两个文件拷贝到对应处,icon_by_toly.dart写好(在下面),右键运行就自动生成iconfont.dart了
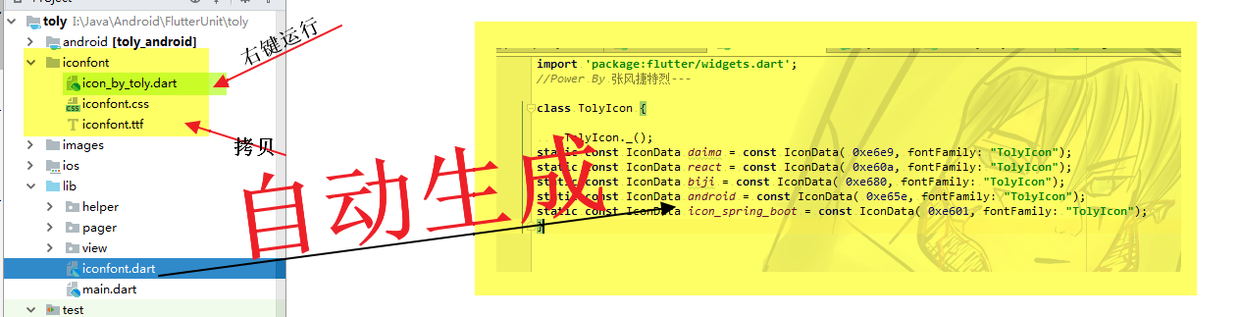
代码生成器:icon_by_toly.dart
1 | import 'dart:io'; |
pubspec.yaml的flutter标签下也会自动生成配置:
1 | fonts: |
1 | Icon(TolyIcon.icon_spring_boot)//颜色可自行处理 |

友情提示:下载之前最好把图标名字改一下,不然之后找起来费劲
如果实在不想该,可以点击这里查看名字和图标的对应情况

二、综合小案例
1.初始代码:主页面:android_stack.dart
1 | import 'package:flutter/material.dart'; |
2.拼接底部条

2.1:常量的准备:(为了方便使用或修改)
1 | class ItemBean { |
2.2:底部栏:
1 | //成员变量 |
2.3:底部栏点击监听:_onTapBNB
1 | //底部栏点击监听 |
3:页面条目:
第五天写了几个条目,现在拿来用(详细分析见第五天,这里不废话了)
| 静态填充 | 左侧滑栏 |
|---|---|
 |
 |
3.1:左侧滑栏:left_draw.dart
1 | class LeftDrawPage extends StatefulWidget { |
3.2:列表静态填充:home_list.dart
1 | class HomeListPage extends StatefulWidget { |
4.动态数据获取:
昨天已经把http获取数据的内容将过了,并且把服务端的数据解析了
今天就是使用这些数据,来填充静态界面,api接口介绍和NoteBean昨天已完成
封装一个获取数据的方法:简单说下用法:style是类型:Android是A ;SpringBoot是SB ; React 是Re ; 笔记是 Noteoffset和num 联合使用可以达到分页效果, 比如offset=24,num=12,就是一页12条数据的第3页
1 | import 'dart:convert'; |
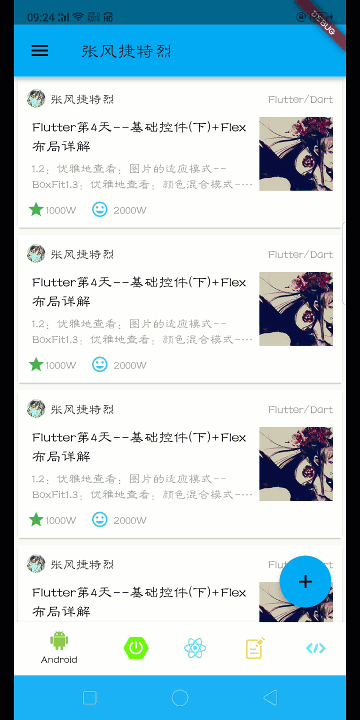
5.用一个数据来进行填充测试:
主页面:android_stack.dart,initState的时候获取数据,并更新状态
1 | //定义一个成员变量 |
列表界面:home_list.dart:接收主界面传来的_notes,并渲染数据
1 | class HomeListPage extends StatefulWidget { |
现在万事俱备,东风也到了,num小小动一下:num=30
| – | – |
|---|---|
 |
 |
也许你感觉还未开始,但确实已经结束了…
6.底部导航栏的切换:(下面两个图一样的,为了撑场面…)
刚才是数据没有分类型,现在点击底部导航,按范围进行展示
get(style: "area/A", num: 30)//这样就是展示又有安卓类的文章
| - | - |
|---|---|
 |
 |
android_stack.dart添加成员变量
这里我默认加载完,做分页的话,再添加个_count的成员变量就行了
1 | String style = "area/A"; |
7.底部栏和搜索功能
底部栏用法详情在第四篇
| – | – |
|---|---|
 |
 |
底部栏:这里把事件写在里面了,你也可以抽成方法
或者有些控件太长,你也可以抽出来做变量
1 | var searchSheet = BottomSheet( |
Ok,小案例就这样
三、Android代码交互
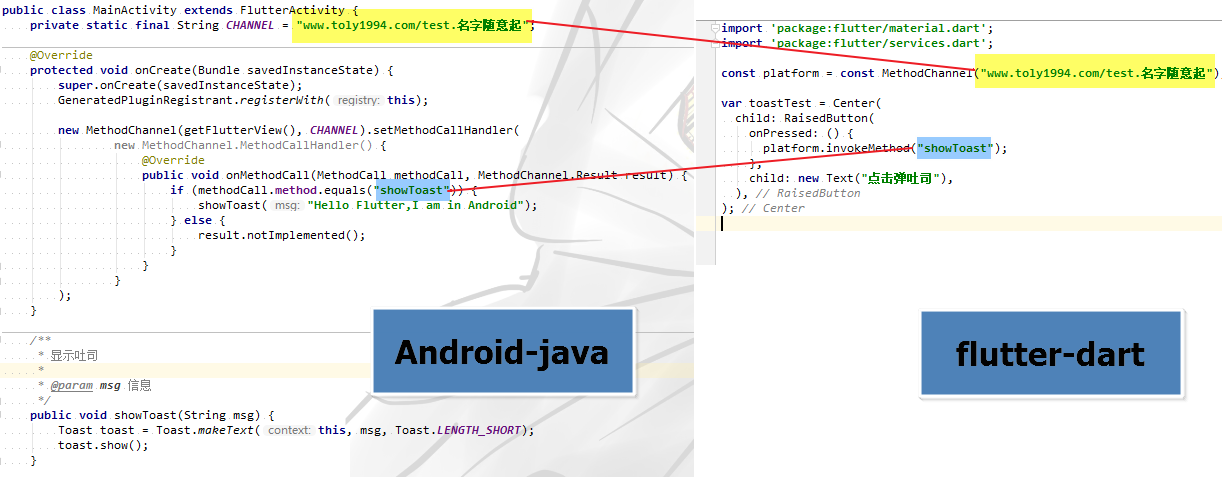
1.最简单的无参无返回函数调用:两对应
不得不说:前六天不能弹吐司真是不好受,原生交互肯定先拿他开刀

1.1:Android代码
1 | public class MainActivity extends FlutterActivity { |
1 | import 'package:flutter/material.dart'; |
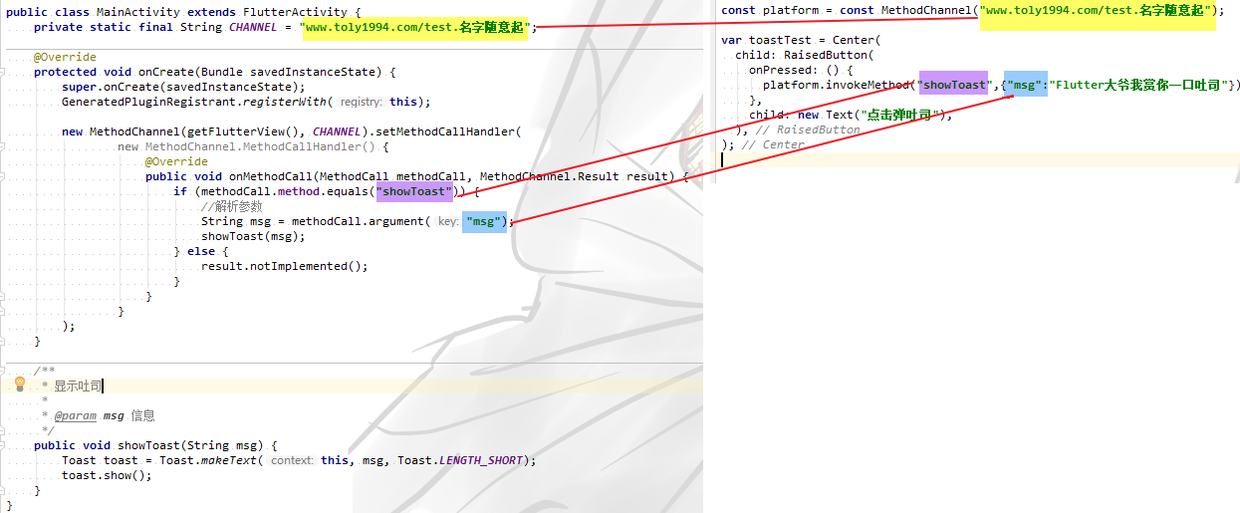
2.Flutter中传参,调用Android含参方法:三对应

2.1:Android代码
1 | public class MainActivity extends FlutterActivity { |
2.2:Flutter代码:
1 | import 'package:flutter/material.dart'; |
2.3:加返回值的方法调用:
举什么例子,我想了一会,就来个MD5码吧

1 | //Activity添加判断分支 |
2.2:Flutter代码:
1 | import 'package:flutter/material.dart'; |
基本上也就这三种情况
[彩蛋]–以前Mark的一个小点:Card的shape
有人说学习的时候一个问题会牵扯到很多其他的问题,问题一多就无从下手
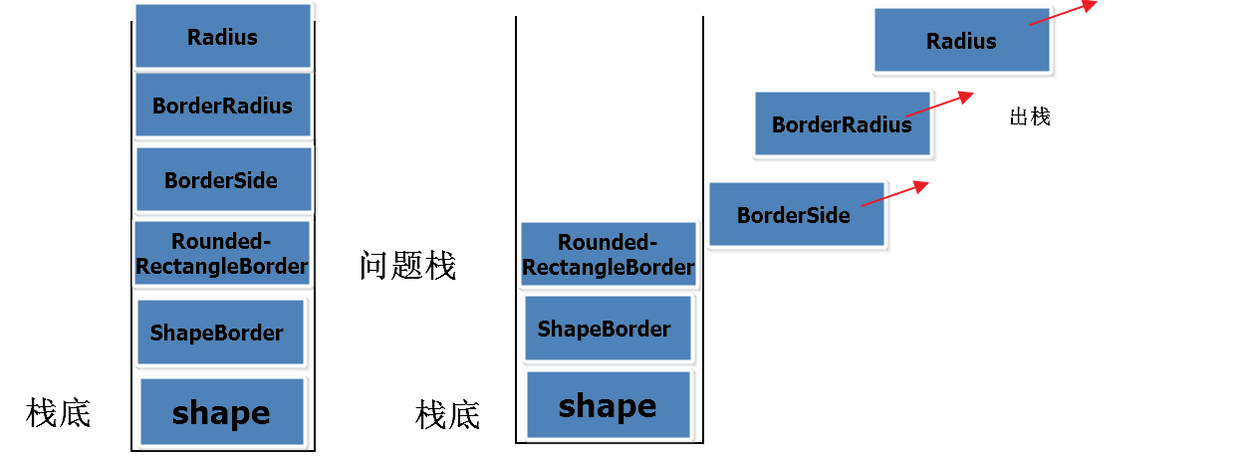
我只说一个字:”栈”:来最后一波学习看源码的方法了,走起
1.shape是什么:形状
现在的问题栈

可见默认圆角是4的RoundedRectangleBorder
1 | ---->[shape属性]---- |
一个shape牵扯出这么多类,有人可能就
栈溢出了,还是使用默认的吧,等一下,且听我分析
当Radius入问题栈之后,看一下也就是两个值,就出栈了,BorderRadius跟着也出栈了
BorderSide三个字段,看一下,出栈了,现在栈顶是RoundedRectangleBorder你还不会吗?
2. RoundedRectangleBorder改变圆角大小+边线
1 | var card_shape = Card( |
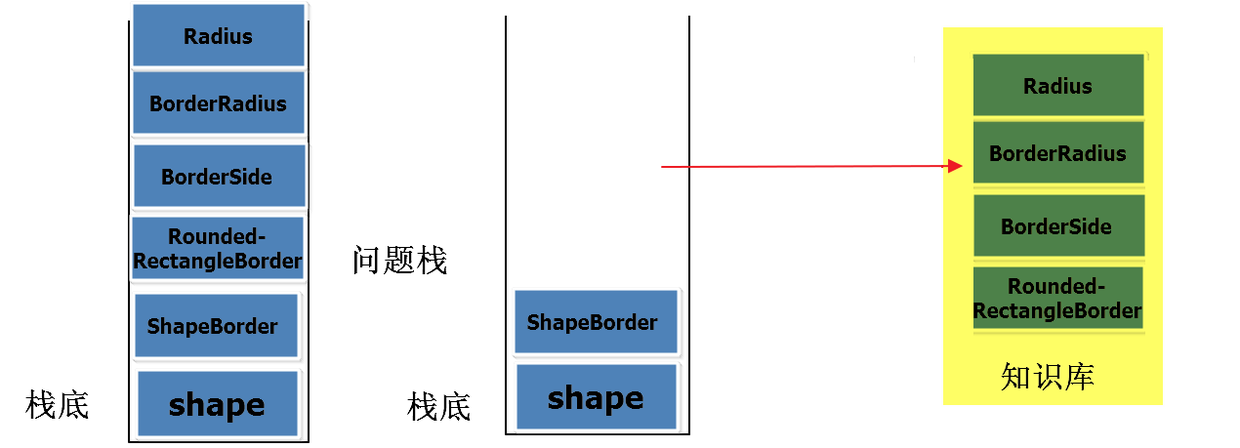
那弹栈过后问题跑哪里?
我想应该是临时知识库吧,你解决的问题中获取的知识,经验会累积
可能长久不用知识库里的知识会漏掉,但印象有的,下一次再入栈,解决起来会更快
在的知识库里扎根的知识,那当你遇到时,就不是问题,直接弹栈,这样想学习是不是也挺好玩的
大神级的Coder知识库丰富,问题都不是问题,也许偶尔入栈一两个,但栈很深(感觉挺浪费哈)
新手就是栈比较浅,问题多,所以容易StackOver,所以修炼你容忍问题的能力(栈深)很有必要
像我这样不深不浅的刚刚好,会碰到问题,也能一点点解决,一点一点踏上封神之路
但所有的大神也都是从新手这样过来的,解决问题的能力也不是与生俱来,祝你慢慢弹栈,收获多多。
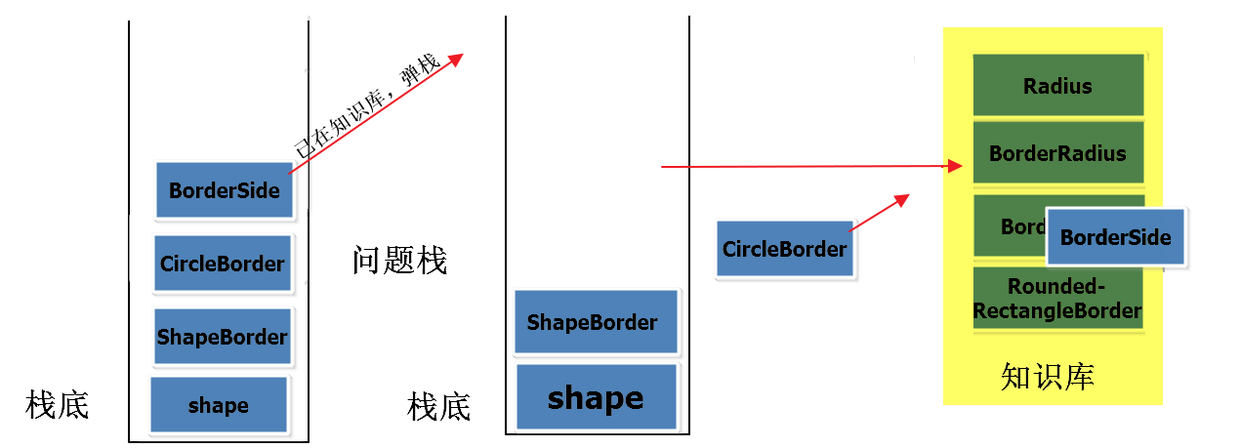
3.接下来看ShapeBorder在栈顶,我们去瞅瞅
BorderSide现在已经化敌为友,CircleBorder岂不是秒出栈,并且俘获
CircleBorder一枚
而且BorderSide强化+1,知识就是这样积累的,难道还有别的方法吗?除非记忆拷贝…
转一转当CD背景感觉挺不错
1 | var card_shape = Card( |
4.前方高能,非战斗人员带好零食
其实觉得shape好玩,是在粗略看源码时,看到了canvas,才mark的
自定义ShapeBorder走起:画具在手,天下我有
1 | var card_shape = Card( |
路径封装(稍微优化了一下)
1 | /** |
师傅领进门,修行在个人,我已经把功力传给你了,能否修成正果,就看各自造化。事了拂衣去,深藏功与名,Ok,Flutter七日游,完捷散花,自认为没有烂尾,耶!